Controlling the peripheral in IMX8 with M4 core

Hello everyone,

This is not a problem but rather a request for guidance, I’ve been able to set up the environment and develop using visual studio and VS code using C++ on my Apalis IMX8 and ixora board, but all the guides use libraries from the linux system and I’m assuming all peripherals are then run using the Cortex-A , the question is how to develop and run code using the M4 cortex ?

I am a bit lost on the developer website, and the only guides I can find using the M4 are if I am using the embedded linux image not the torizon platform

thank you for your help

Hi @AhmedMobarez,

We are aware of our lack of information on the developer website about the Cortex-M and we’re already working on that. We expect to publish more articles and tutorials about it in the next months. Sorry about that.

For that, you’ll need to use the SDK and toolchain from NXP. Have you downloaded this SDK already? You can find it here: Sign in to NXP.com | NXP Semiconductors. You will also need an NXP account to download.

Let me know what you’ve done already so I can help you with the next steps.

You can also read this link: Load binary file from eMMC instead of SD card - #4 by swiss
I’m talking with another customer about how to load the code into Cortex-M using TorizonCore, so maybe it will help you too.

Best Regards,
Hiago.

hello @hfranco.tx ,
I already have the SDK downloaded, I didn’t run any examples yet as I was looking for a way to develop and run the code while connected to the board instead of coding and saving the .elf and .bin files on the SD card and loading from there, I am also in the process of checking the SDK structure and what do I need to run it.

It would be great if you can guide me to just run a simple blinky program, I can continue from there

Thank you

hello @hfranco.tx ,

I just looked at the other issue, I can see how to run the code from the eMMC now, but how can I debug the code in this case ?

Best,
Ahmed

Hi @AhmedMobarez,

There are mainly two possibilities to debug the Cortex-M: You can use the UART serial to see messages on your screen and interact with the Cortex-M or you could use the JTAG with a Jlink device to debug the code.

The first one is a kind of “print” debug, you will see everything that your code is printing. The second one you can use the JTAG to control your code and debug it better. Unfortunately, we don’t have a guide on our developer webpage about the JTAG method, but we are working on that.

For the first mode though, it’s very straightforward, you will need to use the “print” function and basically, that’s it. However, you will need a USB to UART converter and a custom device tree to enable this feature. I can walk you through how to do it step by step if you want.

Do you have a USB to UART converter? (RX, TX, and GND).
Wich carrier board are you using?
I’ll make a guide here for you and reply to you with the steps as soon as possible.

Best Regards,
Hiago.

Dear @hfranco.tx ,

Thank you very much, after the solution of this issue I can communicate serially with the board, so this guide will be quite helpful.

I am using the Ixora board V1.2 with an Apalis module imx8, running TorizonCore

also do you have any jlink devices that are recommended ?

Best,
Ahmed

Hi @AhmedMobarez,

Ok, no worries, I will make this guide here and send it to you as soon as I finish testing here.

Ok, in this case, unfortunately, Ixora does not have JTAG support, only our Evaluation board. In this case, you’ll have to use the UART to debug your Cortex-M. Apalis iMX8 actually have two Cortex-M cores, if you are planning to use both of them, two UART converters will be needed to see what’s happening.

Best Regards,
Hiago.

Hi @AhmedMobarez,

Sorry for my late response. I was trying to use the UART on the Ixora board but turns out that the UART pins are not accessible on Ixora. I apologize for the wrong information in my last response.
Therefore, with Ixora, it won’t be possible to use the UART from Cortex-M. It’s only possible to use the UART and JTAG with our Apalis Evaluation Board.

However, I tested here a simple blink program and it worked fine. Here is the tutorial:

  1. You’ll need to download the SDK from NXP, as you already did.
  2. Second, go to the folder below and change the EXAMPLE_LED_PIN to 8U in order to blink the LSIO.GPIO0.IO8, which is the GPIO1 (pin 13, connector X27) of your Ixora board. I chose this pin because I wanted to use the GPIO1, but you can choose whatever pin you want, remember to edit the pin that M4 is using.
boards/mekmimx8qm/driver_examples/gpio/led_output/cm4_core0/
  1. Now compile the project using the provided script. Here I compiled the debug project, so I had the use the m4_image.bin file.
  2. Send it to your module, either using a storage device or using SCP. Here I stored min under /var/ folder in TorizonCore.
  3. Boot into the uBoot terminal, and load your binary. For Apalis iMX8, the bootloader provides you with a few useful variables:
    a. loadm4_image_0
    b. m4boot_0
    To use your loadm4_image_0, first, we need to set the load command that uBoot will use. Here I’ve used the ext4load command (use the setenv command to edit the variable):
Apalis iMX8 # printenv load_cmd
load_cmd=ext4load mmc 0:1

Then, you’ll need to set where your m4 image is, using the m4_0_image:

Apalis iMX8 # printenv m4_0_image 
m4_0_image=/ostree/deploy/torizon/var/m4_image.bin

Now, you should be set, as you can see from my terminal:

Apalis iMX8 # printenv loadm4image_0
loadm4image_0=${load_cmd} ${loadaddr} ${m4_0_image}
Apalis iMX8 # printenv m4boot_0
m4boot_0=run loadm4image_0; dcache flush; bootaux ${loadaddr} 0

If you run run m4boot_0, you’ll see the GPIO1 blinking. To do this automatically, you can edit the bootcmd command and add the m4boot_0 before the bootcmd_mmc0 command:

Apalis iMX8 # printenv bootcmd
bootcmd=run m4boot_0; run bootcmd_mmc0

Here I did everything using the M4 core 0, but if you repeat everything using the core 1, it will be the same step-by-step guide that I showed you.

As I mentioned before, we are still working on our documentation about the Cortex-M.

Let me know if you need any questions.

Best Regards,
Hiago.

hello @hfranco.tx ,

Thank you for the guide, I will try and tell you how it goes.

One question here now is what do you mean by:

the UART pins are not accessible on Ixora

are you talking about using print function for debugging and checking from the UART connection on UART1 ?

if that’s the case, wouldn’t it be possible to use one of the other available UART pins ( UART 2/3) and “transmit” debug messages ( not using print ) and read it via a serial console ?

That’s just what I have on the top of my head, please advise if you know/think of any other way to debug the code.

Best,
Ahmed

hello @hfranco.tx ,

I have tried following your steps but I have a an issue.

1- when I run the m4boot_0, the device keeps rebooting and I get the following console output

Apalis iMX8 # run m4boot_0
Power on M4 and MU
Copy M4 image from 0x87000000 to TCML 0x34fe0000
Start M4 0
b

U-Boot 2020.04-5.6.0+git.7d1febd4af77 (Jan 01 1970 - 00:00:00 +0000)

CPU:   NXP i.MX8QM RevB A53 at 1200 MHz

DRAM:  4 GiB
MMC:   FSL_SDHC: 0, FSL_SDHC: 1, FSL_SDHC: 2
Loading Environment from MMC... OK
In:    serial
Out:   serial
Err:   serial
Model: Toradex Apalis iMX8 QuadMax 4GB Wi-Fi / BT IT V1.1C, Serial# 07107575

 BuildInfo:
  - SCFW 99e479ce, SECO-FW 2f7f6f59, IMX-MKIMAGE 8947fea3, ATF 835a8f6
  - U-Boot 2020.04-5.6.0+git.7d1febd4af77

switch to partitions #0, OK
mmc0(part 0) is current device
flash target is MMC:0
Net:   eth0: ethernet@5b040000
Fastboot: Normal
Normal Boot
Hit any key to stop autoboot:  0
Apalis iMX8 # printenv m4boot_0
m4boot_0=run loadm4image_0; dcache flush; bootaux ${loadaddr} 0
Apalis iMX8 # setenv bootcmd 'run m4boot_0; run bootcmd_mmc0'
Apalis iMX8 # printenv bootcmd
bootcmd=run m4boot_0; run bootcmd_mmc0
Apalis iMX8 # saveenv
Saving Environment to MMC... Writing to MMC(0)... OK
Apalis iMX8 # m4boot_0
Unknown command 'm4boot_0' - try 'help'
Apalis iMX8 # run m4boot_0
Unknown command '0x87000000' - try 'help'
Power on M4 and MU
Copy M4 image from 0x87000000 to TCML 0x34fe0000
Start M4 0
b

U-Boot 2020.04-5.6.0+git.7d1febd4af77 (Jan 01 1970 - 00:00:00 +0000)

CPU:   NXP i.MX8QM RevB A53 at 1200 MHz

DRAM:  4 GiB
MMC:   FSL_SDHC: 0, FSL_SDHC: 1, FSL_SDHC: 2
Loading Environment from MMC... OK
In:    serial
Out:   serial
Err:   serial
Model: Toradex Apalis iMX8 QuadMax 4GB Wi-Fi / BT IT V1.1C, Serial# 07107575

 BuildInfo:
  - SCFW 99e479ce, SECO-FW 2f7f6f59, IMX-MKIMAGE 8947fea3, ATF 835a8f6
  - U-Boot 2020.04-5.6.0+git.7d1febd4af77

switch to partitions #0, OK
mmc0(part 0) is current device
flash target is MMC:0
Net:   eth0: ethernet@5b040000
Fastboot: Normal
Normal Boot
Hit any key to stop autoboot:  0
Unknown command '0x87000000' - try 'help'
Power on M4 and MU
Copy M4 image from 0x87000000 to TCML 0x34fe0000
Start M4 0
b


And this keeps repeating
I also get this output on the GPIO pin

when this happens, the load_cmd, m4_0_image reset to the following:

Apalis iMX8 # printenv load_cmd
## Error: "load_cmd" not defined
Apalis iMX8 # printenv m4_0_image
m4_0_image=m4_0.bin

even though I enter the saveenv command, the way I set the variables is as follows:

Apalis iMX8 # setenv load_cmd 'ext4load mmc 0:1'
Apalis iMX8 # printenv load_cmd
load_cmd=ext4load mmc 0:1
Apalis iMX8 # setenv m4_0_image '/home/m4_image.bin'
Apalis iMX8 # printenv m4_0_image
m4_0_image=/home/m4_image.bin
Apalis iMX8 # saveenv
Saving Environment to MMC... Writing to MMC(0)... OK


The only changes I made to the files were to the following file “gpio_led_output.c” , the changes were:

#define EXAMPLE_LED_GPIO     LSIO__GPIO3 -> LSIO__GPIO1
#define EXAMPLE_LED_GPIO_PIN 7U -> 8U

Any idea what’s happening ?

Update #1:

  • I reverted the GPIO pin changes and used GPIO3, same result
  • the environment variables are now actually saved and do not reset, not sure what changes, maybe I was doing something wrong

Apalis iMX8 # printenv load_cmd
load_cmd=ext4load mmc 0:1
Apalis iMX8 # printenv m4_0_image
m4_0_image=/home/firmino/m4_image.bin
Apalis iMX8 # printenv loadm4image_0
loadm4image_0=${load_cmd} ${loadaddr} ${m4_0_image}
Apalis iMX8 # printenv m4boot_0
m4boot_0=run loadm4image_0; dcache flush; bootaux ${loadaddr} 0

Just an additional question, do I need to change the device tree before doing all this ? maybe now Cortex-A is set to control the GPIOs ?
because I didn’t have any issues blinking the LED using visual studio and deploying the code to torizon

Hi @AhmedMobarez,

Let me go through your first answer.

The problem here is that M4 core 0 uses pins 110 and 120 from the SODIMM connector that we only can access using the Evaluation Board.

I’m not aware of any other pins that we can use to debug the core 0 besides M40.UART0.RX and M40.UART0.TX, I checked the datasheet and this function is not available for other pins. However, I’ll test this and reply to you if I find something.

Before we dive into your next question, I was able to use the UART on the Ixora board with the M4 core 1. As I mentioned before, core 0 is not accessible, but for core 1 we can access the pins on the Ixora board.

For that, you can go to /boards/mekmimx8qm/demo_apps/hello_world/cm4_core1/ and compile the hello_world demo. Here, I compiled the debug version (build_debug.sh).
Then, I sent the binary to my Apalis and ran it through uBoot, same as you did, but now you will have to use the commands loadm4image_1, m4image_1, and m4boot_1 to specify that you want to use the M4 core 1.

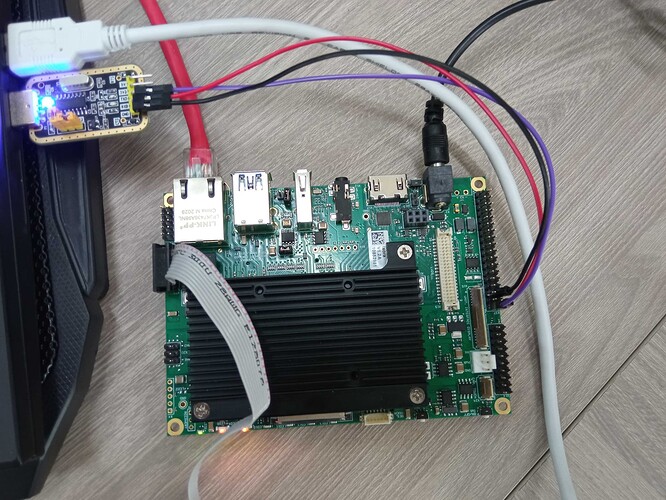
Using a USB to TTL converter, you will see the “hello world.” on pins 35 and 36 from the x27 connector.
Pin 35 will be connected on the Converter RX and 36 to TX. GND will be connected to any GND on Ixora.

Here is my setup:

Then, I made some modifications to the hello_world.c to print a loop of messages:

diff --git a/boards/mekmimx8qm/demo_apps/hello_world/cm4_core1/hello_world.c b/boards/mekmimx8qm/demo_apps/hello_world/cm4_core1/hello_world.c
index 9275fb0..515c0f9 100644
--- a/boards/mekmimx8qm/demo_apps/hello_world/cm4_core1/hello_world.c
+++ b/boards/mekmimx8qm/demo_apps/hello_world/cm4_core1/hello_world.c
@@ -30,8 +30,6 @@
  */
 int main(void)
 {
-    char ch;
-
     /* Init board hardware. */
     sc_ipc_t ipc = BOARD_InitRpc();
 
@@ -42,9 +40,12 @@ int main(void)
 
     PRINTF("hello world.\r\n");
 
+    uint8_t count = 0;
+
     while (1)
     {
-        ch = GETCHAR();
-        PUTCHAR(ch);
+        PRINTF("hello world! %d\r\n", count);
+        if (count == 255) count = 0;
+        else count++;
     }
 }

Now you will see an endless loop of hello worlds. Nest, if you boot the Linux Kernel, you will see that M4 will stop printing on the screen. That’s because Linux Kernel uses those pins for PWM and uart communication, so we need an overlay to disable them:

/dts-v1/;
/plugin/;

/* Disable PWM0 and PMW1 to use M4 Core 1 UART */

/ {
	compatible = "toradex,apalis-imx8-v1.1-eval",
		     "toradex,apalis-imx8-eval",
		     "toradex,apalis-imx8",
		     "fsl,imx8qm";
};

&pwm0 {
    status = "disabled";
};

&pwm1 {
    status = "disabled";
};

&lpuart2 {
    status = "disabled";
};

If you apply this overlay, you will see M4 in an endless loop of prints and you will be able to see Linux Kernel botting without any problems.

Now, let’s go through your next question.

I don’t know what was the problem, maybe you did something wrong with the variables? I’m not sure, I’ll need to test this on my side.

Here I didn’t have any issues either. I can blink the LEDs using Torizon at the same time that M4 is using the pins. I think this is possible because of SCFW, maybe it gives the owner of the GPIO pin when Cortex-A requests it, and then gives it back to M4. However, using the same pin between the two cores can be problematic, I would recommend disabling this pin from the device tree, so Linux will not access it.

I hope this makes things clearer. As I said before, we are updating our Cortex-M documentation, so I’m still testing some features.

Feel free to ask me if you have any further questions.

Best Regards,
Hiago.
Dear @hfranco.tx ,

I will try the hello world program and get back to you.

regarding the issue with restarting I had yesterday, this is now fixed when I moved the binary file from /home to /var as you initially mentioned, this was something I missed.

right now I get the following on my uboot terminal:

Apalis iMX8 # run m4boot_0
17264 bytes read in 30 ms (561.5 KiB/s)
Power on M4 and MU
Copy M4 image from 0x87000000 to TCML 0x34fe0000
Start M4 0
bootaux complete
Apalis iMX8 # run m4boot_0
17264 bytes read in 30 ms (561.5 KiB/s)
## Auxiliary core is already up
Apalis iMX8 #

However, nothing is happening on the pin, I tried with the default

#define EXAMPLE_LED_GPIO_PIN 7U and your suggested change to use GPIO3 8U
I will attach the file I used.
gpio_led_output.c (2.5 KB)

Both scenarios I didn’t get anything on the pin

Hi @AhmedMobarez,

Could you send me the output from the commands below?

printenv load_cmd
printenv m4_0_image
printenv loadm4image_0

Can you confirm that you recompiled your binary and moved to /var/?
Finally, can you confirm what pin you’re using in your Ixora board?

Best Regards,
Hiago.

hello @hfranco.tx ,

this is the output of the terminal


Apalis iMX8 # printenv load_cmd
load_cmd=ext4load mmc 0:1
Apalis iMX8 # printenv m4_0_image
m4_0_image=/ostree/deploy/torizon/var/m4_image.bin
Apalis iMX8 # printenv loadm4image_0
loadm4image_0=${load_cmd} ${loadaddr} ${m4_0_image}

The following is a picture of my connection, pin 7 → GND , pin 15 → GPIO3

and for the binary file, I deleted it from the Ixora, and from host, built it again and copied it.
could you provide me with your binary file for testing ?

Also in the attached file, do I only change 7U to 8U and leave the LSIO_GPIO3 as it is ( to use GPIO1 instead of GPIO3) ?

Best,
AM

Hi @AhmedMobarez,

I think you are using the wrong pin. Have you set LSIO__GPIO0 and 8U? If so, this is the pin LSIO.GPIO0.IO8, which is the GPIO1 from Ixora (pin 13). Can you try this one?
If you want to use the pin 15 though, you’ll need to set LSIO__GPIO0 and 12U, which will use the pin LSIO.GPIO0.IO12 (GPIO3).

Best Regards,
Hiago.

Hello @hfranco.tx ,

Thank a lot, that fixed it, now the blinky program works fine.

Regarding the hello_world example from the previous comment, I built it as it is ( it’s fine to see one message), but I have an error in uboot and the device resets
Apalis iMX8 # run m4boot_1 Unknown command 'loadm4image_1' - try 'help'

Maybe something is wrong with my env. variables, this is how I set them:

Apalis iMX8 # printenv load_cmd
load_cmd=ext4load mmc 0:1
Apalis iMX8 # printenv m4_1_image
m4_1_image=/ostree/deploy/torizon/var/hello_world_m41.bin
Apalis iMX8 # printenv loadm4image_1
loadm4image_1=ext4load mmc 0:1 0x87000000 /ostree/deploy/torizon/var/hello_world_m41.bin
Apalis iMX8 # printenv m4boot_1
m4boot_1=loadm4image_1; dcache flush; bootaux 0x87000000 1

I followed the steps regarding building from the cm4_core1, also the file is in the proper folder.

let me know what you think.

Best,
AM

Hi @AhmedMobarez,

I’m glad this solved your issue!

What do you mean by “it’s fine to see one message” and “the device tree resets”? You can see the hello world but it doesn’t boot with the overlay that I sent you?

Best Regards,
Hiago.

Hello @hfranco.tx ,

I meant that I didn’t edit the file to print “Hello World” in a loop, I just left it as it is and it’s fine for me to run and see one “Hello world” message instead of an endless loop of hello worlds.

and what happens is right after I run run m4boot_1 , I got the error message

Apalis iMX8 # run m4boot_1
 Unknown command 'loadm4image_1' - try 'help'

Then the Ixora board restarts itself, and no message appear on the UART port connected to pin 35 and 36.

let me know if anything is unclear

Hi @AhmedMobarez,

Ok, I’ve found the error, it’s here:

Apalis iMX8 # printenv m4boot_1
m4boot_1=loadm4image_1; dcache flush; bootaux 0x87000000 1

The loadm4image_1 is just an alias, the right command is run loadm4image_1:

Apalis iMX8 # printenv m4boot_1
m4boot_1=run loadm4image_1; dcache flush; bootaux 0x87000000 1

You can fix it by rewriting the m4boot_1 with setenv and then saving your changes with saveenv.

Best Regards,
Hiago.

Hey @hfranco.tx ,

Thanks a lot, that fixed it.

I still have some follow-up question but I think we can close this thread now. thanks a lot for your support

Best,
Ahmed