Would like to see docker printf

Colibri iMX6DL 512 MB IT v1.1B
Colibri Evaluation Board
TorizonCore Upstream 5.6

Hi,

This is a follow up to an earlier issue:
Proper method of using docker run command - Technical Support - Toradex Community

I am still trying to auto start my docker container with no luck.

I would first like to verify that I can get a container running using the docker run command.

I am sure there is something very basic that I am not understanding…

Here is what I have tried:

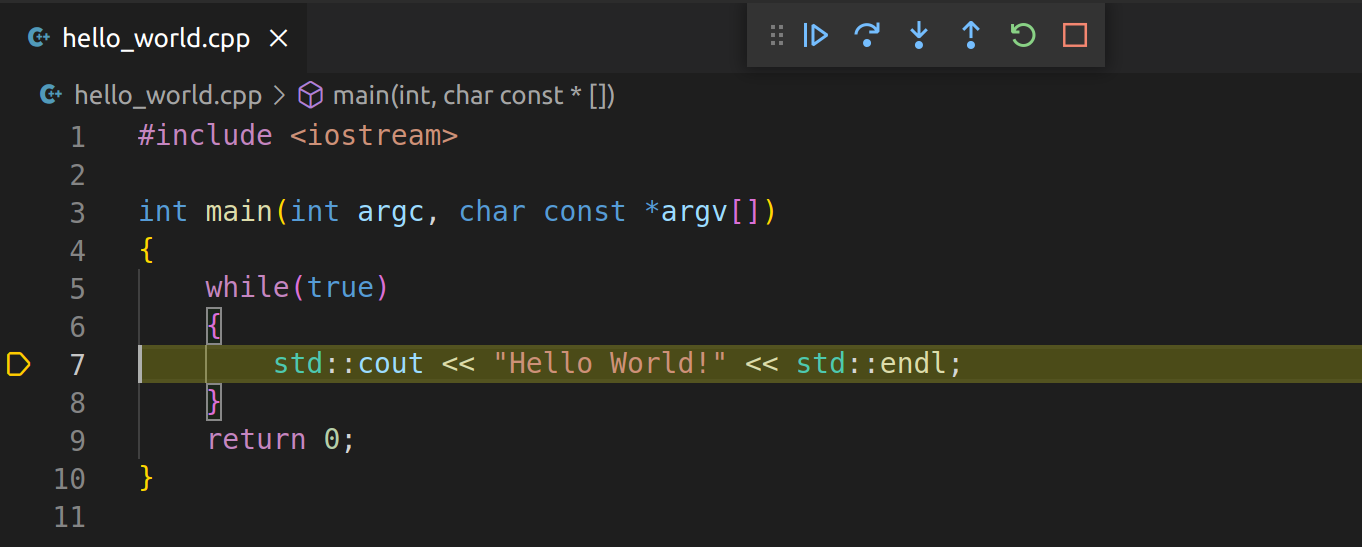
I run my code in debug mode from vscode. I can see the code is working properly in debug mode, and it outputs printf statements to the terminal, and it outputs a log file called data.json to the ~/logs folder as my application should.

I then do a docker ps
CONTAINER ID IMAGE COMMAND CREATED STATUS PORTS NAMES
17d2f91749b4 9df463b4eba6 “/bin/sh -c 'stdbuf …” 43 seconds ago Up 40 seconds emerablockenergybox_arm32v7-debian-no-ssh_bullseye_debug_69ac5093-51e4-4f03-8827-ec9f9390dfe3_latest_instance

Now I want to be able to run this image on startup. First question is, will the container stick around after a reboot? My understanding is “no”. So somehow I need to reboot and see that the image is still there. My understanding is that an image is stored in some sort of repository, while the container is just an instantiation of that image…

I do a docker image ls (or just docker images) and I see it there:

REPOSITORY                                                                                      TAG                 IMAGE ID            CREATED             SIZE
emerablockenergybox_arm32v7-debian-no-ssh_bullseye_debug_69ac5093-51e4-4f03-8827-ec9f9390dfe3   latest              9df463b4eba6        2 weeks ago         97MB
torizon/weston                                                                                  2                   829f5eb1882b        3 weeks ago         309MB
torizon/debian                                                                                  2-bullseye          045ef1b3dc3f        5 weeks ago         62.6MB

And after a reboot, I can still see that image. Terrific.

Now to run that image from a command line.

(I also tried this from root, but is that necessary? my username is root in the configurations settings since I am using CAN bus)

I have used the vscode F1 to get the Torizon: export docker command line

docker run --rm -itd --network 'host' --volume /dev:/dev --volume /home/torizon/logs:/home/torizon/logs --volume /run/udev:/run/udev --volume /tmp:/tmp --volume ContainerVolume:/NewVolume --volume /home/torizon/EmeraBlockEnergyBox:/EmeraBlockEnergyBox:rw --device /dev/spidev3.0:/dev/spidev3.0 --device /dev/colibri-i2c:/dev/colibri-i2c --device /dev/gpiochip0:/dev/gpiochip0 --device /dev/gpiochip1:/dev/gpiochip1 --device /dev/gpiochip2:/dev/gpiochip2 --device /dev/gpiochip3:/dev/gpiochip3 --publish :6502/tcp --publish 8080:8080/tcp emerablockenergybox_arm32v7-debian-no-ssh_bullseye_debug_69ac5093-51e4-4f03-8827-ec9f9390dfe3

I tried with and without adding the --rm and -itd options which I understand are to remove the container upon exit (rm), detach the container so I can still use my existing CLI (-d) and not too sure what -it does…

by the way, I get the following warning, not sure if its normal:
WARNING: Published ports are discarded when using host network mode
e181871bacfc7467687b0cea4755bdec66b92246d135dfd2d92473b97a2cf25c

then I do a docker ps and see my containerID e181871bacfc and try to follow it using

docker logs --follow e181871bacfc

but all I get is:

gdbserver: Error disabling address space randomization: Success
Process /EmeraBlockEnergyBox/EmeraBlockEnergyBox created; pid = 10
Listening on port 6502

also cannot see my data.json file updating…

Can you tell me what I am doing wrong?

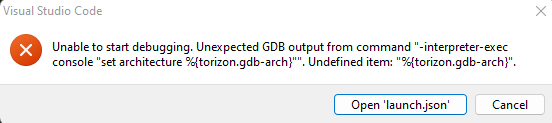
I am also having trouble compiling and installing in release-mode. I did a Torizon: switch to release mode but now I dont see what I am supposed to do to get it loaded onto the target (run without debug gives the following error)
image

Hi @leighjboyd!

You’re right, after the reboot, only the image will be there. The image is stored in your device, and the container is just an instantiation of your image as you said. You can think that the container is your image running on your device.

To start your container automatically after reboot, you will need to add your content to /var/sota/storage/docker-compose/docker-compose.yml inside your device. The good thing is that you don’t need to edit this file manually, you can use our tool called TorizonCore Builder to build a custom TorizonCore image with your container. Please, refer to these articles on how to do it:

Let me know if you need any help with TorizonCore Builder.

Regarding your next problem, you are seeing the log from GDB, which is the debugger that is being used. Since you selected a debug container to run, GDB will start automatically.
When you press F5 to run your container in debug mode, you should see a window with some buttons (in your VSCode):


You can see that GDB is waiting for you to start your code. Since you’re in debug mode, you can run it step by step (F11) or run the code entirely by pressing F5 again. Did you check this? Without pressing F5 again, your code will be paused, so maybe that’s why you’re not seeing anything.

Here is the example on my side, using docker logs on my running container:

colibri-imx8x-06995803:~$ docker logs hello_world_arm64v8-debian-no-ssh_bullseye_debug_385b48d7-d705-42e9-8a2b-33063ea3fe3a_latest_instance
gdbserver: Error disabling address space randomization: Operation not permitted
Process /hello_world/hello_world created; pid = 9
Listening on port 6502
Remote debugging from host 10.22.1.58, port 35670
Hello World!
Hello World!
Hello World!
Hello World!
Hello World!
Hello World!
Hello World!
Hello World!

We can see the print working after I pressed F5 again.

This is your debug container, but you can also create a container for release/production if you want.
Remember, to do that, you will need to build your container again, following these steps:

  • Change to the release mode (you can press F1 and then search for “Torizon: switch to release configuration”)
  • build your image (F1 and “Torizon: build release container for the application”)
  • deploy to your device (F1 and “Torizon: Deploy release container”)
  • run it (F1 and “Torizon: Run/restart release container”).

After that, you’ll see two images: debug and release, just as I did here on my device (my app is called “hiago”):

REPOSITORY                                                                                TAG                 IMAGE ID            CREATED             SIZE
hiago_arm64v8-debian-no-ssh_bullseye_release_c10bdf75-cbfc-41e8-bbf4-4dcc3c37a9ca         latest              7e7030b87b58        18 seconds ago      81.1MB
hiago_arm64v8-debian-no-ssh_bullseye_debug_c10bdf75-cbfc-41e8-bbf4-4dcc3c37a9ca           latest              027707229162        2 minutes ago       84.2MB

Finally regarding your warning:

This happened because you tried to open a port in your device using the network 'host' flag, which is not allowed, as stated here: Host network driver | Docker Docs

If you use the host network mode for a container, that container’s network stack is not isolated from 
the Docker host (the container shares the host’s networking namespace), and the container does not 
get its own IP-address allocated. For instance, if you run a container which binds to port 80 and you 
use host networking, the container’s application is available on port 80 on the host’s IP address.

Running your container like that, copying the entire command from VSCode is not a good idea. Try to use the F5 as I suggested to you, check if that works for you.

I hope that explained a little bit better how containers work. Please, do not hesitate to ask me more questions.

Best regards,
Hiago.

I would like to use the docker-compose file. Mine looks like this:

version: “2.4”
services:
weston:
image: torizon/weston:2
# Required to get udev events from host udevd via netlink
network_mode: host
environment:
- ENABLE_VNC=1
volumes:
- type: bind
source: /tmp
target: /tmp
- type: bind
source: /dev
target: /dev
- type: bind
source: /run/udev
target: /run/udev
cap_add:
- CAP_SYS_TTY_CONFIG
# Add device access rights through cgroup…
device_cgroup_rules:
#… for tty0
- “c 4:0 rmw”
# … for tty7
- “c 4:7 rmw”
# … for dev/input devices
- “c 13:* rmw”
# … for /dev/dri devices
- “c 226:* rmw”

Where am I supposed to put the docker run command line? or the restart command?

But before doing this, is there some way to test that the application will run (i.e. before torizoncore build)

Can you please set up a conference with me? this is urgent for me as we have a demo Wednesday.

managed to build and deploy the release container (although it was still in debug mode) thanks for that.
now to see if it runs better!

Okay, that runs… now I feel like we’re getting somewhere, thanks!

Now how to make it run on startup? I am familiar with TorizonCore-builder, (used it about 10 times at least) so if that’s the way to go, fine. as long as I don’t cause myself a headache when continuing to develop, I hope?

I looked at my docker and docker compose from the tcbworkdir, and they look like this:

# ARG IMAGE_ARCH=arm64v8
# Use the parameter below for Arm 32 bits (like iMX6 and iMX7)
 ARG IMAGE_ARCH=arm32v7
FROM torizon/$IMAGE_ARCH-debian-shell:1.0 
WORKDIR /home/torizon
 
RUN apt-get -y update && apt-get install -y \ 
    nano \ 
    python3 \ 
    python3-pip \ 
    python3-setuptools \ 
    git \ 
    iproute2 \ 
    can-utils \ 
    python3-can \ 
    && apt-get clean && apt-get autoremove && rm -rf /var/lib/apt/lists/*  


version: "2.4"
services:

  weston:
    image: torizon/weston:2
    # Required to get udev events from host udevd via netlink
    network_mode: host
    volumes:
      - type: bind
        source: /tmp
        target: /tmp
      - type: bind
        source: /dev
        target: /dev
      - type: bind
        source: /run/udev
        target: /run/udev
    cap_add:
      - CAP_SYS_TTY_CONFIG
    # Add device access rights through cgroup...
    device_cgroup_rules:
      # ... for tty0
      - 'c 4:0 rmw'
      # ... for tty7
      - 'c 4:7 rmw'
      # ... for /dev/input devices
      - 'c 13:* rmw'
      # ... for /dev/dri devices
      - 'c 226:* rmw'
    command: --developer weston-launch --tty=/dev/tty7 --user=torizon
    healthcheck:
        test: ["CMD", "test", "-S", "/tmp/.X11-unix/X0"]
        interval: 5s
        timeout: 4s
        retries: 6
        start_period: 10s

  kiosk:
    image: torizon/kiosk-mode-browser:2
    security_opt:
      - seccomp:unconfined
    command: --browser-mode http://www.toradex.com
    shm_size: '256mb'
    device_cgroup_rules:
      # ... for /dev/dri devices
      - 'c 226:* rmw'
    volumes:
      - type: bind
        source: /tmp
        target: /tmp
      - type: bind
        source: /var/run/dbus
        target: /var/run/dbus
      - type: bind
        source: /dev/dri
        target: /dev/dri
    depends_on:
      weston:
        condition: service_healthy

My program is called EmeraBlockEnergyBox.

Am I supposed to just add it here in the docker-compose??

Having said that, I would rather use systemctl, since I am already familiar with that method.
I just don’t know what my script should say…

If I do a docker image ls now I get:

REPOSITORY                                                                                        TAG                 IMAGE ID            CREATED             SIZE
emerablockenergybox_arm32v7-debian-no-ssh_bullseye_release_69ac5093-51e4-4f03-8827-ec9f9390dfe3   latest              4d0509848738        24 minutes ago      95.3MB
emerablockenergybox_arm32v7-debian-no-ssh_bullseye_debug_69ac5093-51e4-4f03-8827-ec9f9390dfe3     latest              9df463b4eba6        3 weeks ago         97MB
torizon/weston                                                                                    2                   829f5eb1882b        3 weeks ago         309MB
torizon/debian                                                                                    2-bullseye          045ef1b3dc3f        5 weeks ago         62.6MB
hello-world                                                                                       latest              1ec996c686eb        8 months ago        4.85kB

as I have built the image 24 minutes ago.
Is this when I should call docker run?

I made a little script to do that:

colibri-imx6-10934586:~$ ls
69ac5093-51e4-4f03-8827-ec9f9390dfe3  EmeraAutostartup.service  EmeraAutostartup.sh  EmeraBlockEnergyBox  logs
colibri-imx6-10934586:~$ cat EmeraAutostartup.sh
#! /bin/bash

docker run -ti -a=STDOUT --network 'host' --volume /dev:/dev --volume /home/torizon/logs:/home/torizon/logs --volume /run/udev:/run/udev --volume /tmp:/tmp --volume ContainerVolume:/NewVolume --volume /home/torizon/EmeraBlockEnergyBox:/EmeraBlockEnergyBox:rw --device /dev/spidev3.0:/dev/spidev3.0 --device /dev/colibri-i2c:/dev/colibri-i2c --device /dev/gpiochip0:/dev/gpiochip0 --device /dev/gpiochip1:/dev/gpiochip1 --device /dev/gpiochip2:/dev/gpiochip2 --device /dev/gpiochip3:/dev/gpiochip3 --publish :6502/tcp --publish 8080:8080/tcp emerablockenergybox_arm32v7-debian-no-ssh_bullseye_debug_69ac5093-51e4-4f03-8827-ec9f9390dfe3

OMG, its running!
Except that it can’t find my files which are in ~/logs.

2022-06-20--20-28-54-UTC
ERROR_FILE_NO_DELETE

 STATE: OPERATING, SEQUENCE: DURING  TIME 0
CAN messages: 281

The File /home/torizon/logs/tmpdata2022-06-20--20-28-49-UTC.json         not Found
The File /home/torizon/logs/tmpdata2022-06-20--20-28-49-UTC.json         cannot be read
The File /home/torizon/logs/tmpdata2022-06-20--20-28-49-UTC.json         cannot be Edited

maybe here is where I should be calling the script file from root? hmm… didn’t seem to help.


The File /home/torizon/logs/tmpdata.json         not Found
The File /home/torizon/logs/tmpdata.json         cannot be read
The File /home/torizon/logs/tmpdata.json         cannot be Edited
Error Failed to Create File. /home/torizon/logs/tmpdata.json


2022-06-20--20-34-50-UTC
ERROR_FILE_NOT_FOUND

 STATE: OPERATING, SEQUENCE: DURING  TIME 0
CAN messages: 318

free(): double free detected in tcache 2
Aborted (core dumped)
colibri-imx6-10934586:/var/rootdirs/home/torizon#

ouch! that one was even more serious!

seems like it was running on the debugger as well. Not sure how to stop it…
Ill reboot i guess.

So strange… Now I get some CAN errors


RTNETLINK answers: Operation not permitted
CAN bus initialization...Set baudrate to 500000
RTNETLINK answers: Operation not permitted
Set CAN bus UP.
RTNETLINK answers: Operation not permitted
socketCAN opened

In my debugger I get these lines, ie no RTNETLINK answers…

Detaching from process 11
CAN bus initialization...Set baudrate to 500000 
Detaching from process 13
Set CAN bus UP. 
Detaching from process 15
socketCAN opened

So it seems like I can open the CAN bus from the debug application, but not from the release container.

I can also command the can baudrate and set the can to “up” before running the application and it works. Why would the release container not have access to ip link?

the application is NOT being run in priviledged mode:

colibri-imx6-10934586:~$ docker inspect --format='{{.HostConfig.Privileged}}' 04fcb1b9867a
false

this is probably why…

okay, I needed to add the option --priviledged to the docker run command…
Also, needed to remove the -t option, otherwise got a message from systemctl that
Jun 20 21:29:10 colibri-imx6-10934586 EmeraAutostartup.sh[854]: the input device is not a TTY

Now i think its going to work.

Hi @leighjboyd,

You don’t need to put the run command inside the docker compose file. When you boot your module, Torizon (using docker-compose) will parse this file automatically and start your container.
About the restart command, you only to put this above your service, for example, let’s say you want to run Portainer on your device:

portainer:
    image: portainer/portainer-ce@sha256:3ff080a0cd2a45bd0bde046069973b3fe642c3ee
4d43c5b429dd7b77f0057c7d7
    ports:
    - 8840:9000/tcp
    restart: always

You just need to add the restart flag in your docker compose file. Here are the options for this flag:

no: Do not automatically restart the container. (the default)

on-failure: Restart the container if it exits due to an error, which manifests as a non-zero exit code.

always: Always restart the container if it stops. If it is manually stopped, it is restarted only when the Docker daemon restarts or the container itself is manually restarted. (See - the second bullet listed in restart policy details)

unless-stopped: Similar to always, except that when the container is stopped (manually or otherwise), it is not restarted even after the Docker daemon restarts.

Reference: How to Autorun an Application With Torizon OS | Toradex Developer Center

Yes, you need to add your image to the docker compose file and then make a reference to where it should download your image. For example, let’s say you added your image to your Docker Hub (hub.docker.com), located at leighjboyd/EmeraBlockEnergyBox (your user/the name of your image from Docker Hub), your docker-compose file would look like this:

# Just an example!
emerablockenergybox:
    image: leighjboyd/EmeraBlockEnergyBox:latest

Below emerablockenergybox: (just like I did with the image: parameter)you will also add your parameters, like volumes:, ports:, etc. This will configure and start your container automatically.
By the way, you don’t need o deal with the systemctl to manage your containers, you only need to create your docker-compose file and Torizon will start everything automatically.

Ok, now regarding your problem with the CAN bus.
For example, let’s say you can access your CAN can bus using /dev/can0. You need to pass this device to your container for it to have access to your CAN bus:

# Just an example!
emerablockenergybox:
    image: leighjboyd/EmeraBlockEnergyBox:latest
    devices:
        - "/dev/can0:/dev/can0"

This will expose the Can Bus to your container, so you don’t need to use the privileged flag.

Just remember that for everything that I’ve mentioned here, you can use the VSCode extension to automatically create the docker-compose file (press F1 and then search for “Torizon: export docker-compose file”).

Were you able to make your program run?

Best Regards,
Hiago.

How do I push my image to the Docker Hub?

Do i deploy it to the target board and then push it from there?

so all of the things in the docker run command need to go into the docker compose file? Seems like this should be automatically done, no?

Oh, I see you do have a command to do that, if I read down to the end of your post!

Hmm… okay, the fact that we are playing around with docker compose files in my tcbworkdir (the place where i build my images, etc) makes me think that maybe this solution is no good for me. I can’t be rebuilding the whole image every time I want to recompile and give the latest version to my colleagues, is there an easier way?

would be great if you could call me, actually, at this point Im so frustrated. now my CS doesn’t work on SPI…

Hi @leighjboyd,

First, you need to create an account on hub.docker.com. Then, you need to create a repository. For that, go to your profile, click on “Create repository”, give a name for it, and then click again on “Create”.
Let’s say you created a repo called EmeraBlockEnergyBox.
To push to the Docker hub, you basically have two options: using the command docker push on your terminal or using the VSCode extension.

For that, press F1 and search for “Torizon: push application container to a docker registry”.
VSCode will ask for a name and a tag, so you can put the name of your repo, like “leighjboyd/EmeraBlockEnergyBox:latest”. It will also ask you for your login and password.
After that, your image will be online and ready for download.

I don’t know if I understand correctly, but the docker-compose file will only tell which containers your device needs to download and how to configure them. But the container itself, I mean the code that is being executed inside the container, to update that you only need to push a new version of your image to your repository.

Let’s get your example again. Let’s say your image is called EmeraBlockEnergyBox and you already put it in your docker-compose:

# Just an example!
emerablockenergybox:
    image: leighjboyd/EmeraBlockEnergyBox:latest
    devices:
        - "/dev/can0:/dev/can0"

Now, to update your code, you will go to your VSCode, update the code and push the image again into your docker hub. This will create a new version of your image. Therefore, you can perform a docker pull on your device to get the new version of your software (or use our OTA service for that).

What’s the problem with your SPI? Did you expose it to your container using the device parameter?

I hope this makes things a bit more clear.

Best regards,
Hiago.

Okay, that’s an interresting workflow… Thanks a lot for the detailed instructions!!

So the SPI problem was resolved, I was using the wrong CS the whole time, but the device didnt care becasue that particluar line (which I wasn’t using until recently fixing up the device tree) was always low!

1 Like

One more question,
Where does the docker-compose file go?
Do I have to build it into the image, or deploy it from my dev container in VSCODE?

Hi @leighjboyd,

This file is inside /var/sota/storage/docker-compose/ in your module. Therefore, you can send your docker-compose to your module (by SCP or some storage device, for example) and copy the file to this path that I’ve sent you. Then reboot your module.

Another option is to use the TorizonCore Builder and build a custom image with your docker-compose enabled. Here is the guide: TorizonCore Builder Tool - Customizing TorizonCore Images | Toradex Developer Center.

Best regards,
Hiago.

Im not sure I am understanding this… At the time I wrote this question I didn’t even know you could push and pull to DockerHub, but now I have figured out how to do that. Its not really part of my workflow, but whenever someone else needs my code, I go into my target, tag and push the current image to the DockerHub and then they can use the code.

So at the moment I don’t use docker hub or OTA, but just compile and send directly via Ethernet to my target. Do you suggest I change my workflow to send images to docker Hub and then pull the image from the Docker Hub? I assume you wouldn’t even need to connect to your device while compiling the code, is that right?

Right now, docker compose looks like this:

# docker-compose.yml
services:
  emerablockenergybox_arm32v7-debian-no-ssh_bullseye_debug_69ac5093-51e4-4f03-8827-ec9f9390dfe3:
    cap_add:
    - CAP_NET_ADMIN
    depends_on:
    - weston
    devices:
    - /dev/spidev3.0
    - /dev/spidev3.1
    - /dev/colibri-i2c
    - /dev/gpiochip0
    - /dev/gpiochip1
    - /dev/gpiochip2
    - /dev/gpiochip3
    image: emerablockenergybox_arm32v7-debian-no-ssh_bullseye_debug_69ac5093-51e4-4f03-8827-ec9f9390dfe3
    network_mode: host
    ports:
    - 6502/tcp
    - 8080:8080/tcp
    restart: always
    volumes:
    - /dev:/dev:rw
    - /home/torizon/logs:/home/torizon/logs:rw
    - /run/udev:/run/udev:rw
    - /tmp:/tmp:rw
    - ContainerVolume:/NewVolume:rw
    - /home/torizon/EmeraBlockEnergyBox:/EmeraBlockEnergyBox:rw
  weston:
    cap_add:
    - CAP_SYS_TTY_CONFIG
    device_cgroup_rules:
    - c 4:0 rmw
    - c 4:7 rmw
    - c 13:* rmw
    - c 226:* rmw
    environment:
    - ENABLE_VNC=1
    image: torizon/weston:2
    network_mode: host
    volumes:
    - source: /tmp
      target: /tmp
      type: bind
    - source: /dev
      target: /dev
      type: bind
    - source: /run/udev
      target: /run/udev
      type: bind
version: '2.4'

Where would I modify that to make it autostart? and Should this really be done manually? Until now, I have been using Torizon Extension to put commands into the configuration, and they magically turn up in various dockerfiles…

Hi @leighjboyd,

The workflow that you will choose depends on what fits you better. There is no workflow that is correct in this case. What I suggest, I think makes more sense to use the Ethernet for development and debugging, because you can simply compile your container and deploy it to the board. In the case of debugging, using VSCode and the local connection is mandatory, because with that you can run your code step by step. However, if you are in production, DockerHub makes more sense because you will keep there the final container version and your boards can pull it easily.

If your container is listed in the docker compose file, then it will start automatically. The only requirement is this file needs to be inside /var/sota/storage/docker-compose/docker-compose.yml. To create your docker compose file automatically, you can run F1 → “Torizon: export docker-compose file” in your VSCode.

Best Regards,
Hiago.