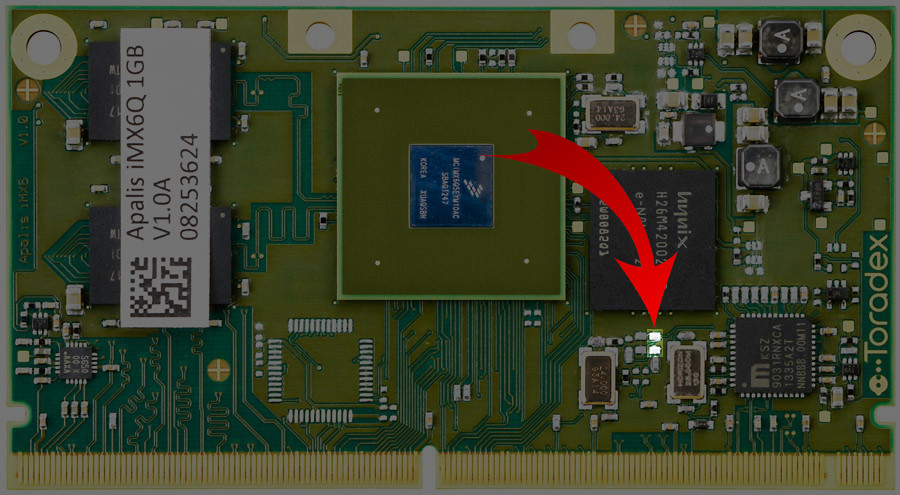
Restore EZ Installer on Apalis iMX6 eval board?

My goal is to install an updated boot2qt image that I built, on my Apalis iMX6 eval board ( the very large eval board ) using SD card, USB flash drive, or other method.

I understand reinstalling East Installer is the first step from recovery mode./

  • I downloaded Apalis-iMX6_ToradexEasyInstaller_5.7.1+build.13.

How to enter recovery mode? I see no change in lsusb output before and after?

When I press space bar, in the serial debug terminal ( X29 ), and enter bmode usb I see resetting… displayed. No menu is displayed in serial terminal. I do not see a new USB serial device appear using the lsusb command on my host PC?

Assuming I can get to the next step, " Load Toradex Easy Installer through the USB OTG interface", how does the recovery-linux.sh script even know which USB serial port to connect to?

Thanks in advance for any tips,

-Ed

Industrial temperature grade DDR3 timings.
Trying to boot from MMC1
U-Boot 2019.07-0+git.694e2136ee (Mar 01 2021 - 21:36:07 +0000)

CPU:   Freescale i.MX6D rev1.5 at 792MHz
CPU:   Industrial temperature grade (-40C to 105C) at 30C
Reset cause: POR
DRAM:  1 GiB
PMIC:  device id: 0x10, revision id: 0x21, programmed
MMC:   FSL_SDHC: 1, FSL_SDHC: 2, FSL_SDHC: 0
Loading Environment from MMC... OK
Display: wvga-lvds (800x480)
In:    serial
Out:   serial
Err:   serial
Model: Toradex Apalis iMX6 Dual 1GB IT V1.1B, Serial# 05212386
Net:   using PHY at 7
FEC [PRIME]
Hit any key to stop autoboot:  1 ... 0 

Apalis iMX6 # bmode usb
resetting ...

This solution using a USB flash drive seemed easier:

  1. Make USB fat stick from boot2qt resulting image build /usb folder
  2. Install USB stick in top socket X54 of Apalis carrier
  3. Connect USB serial terminal 115,200 to serial debug port X29
  4. Boot board with USB stick connected ( do not use a USB hub )
  5. From serial terminal determine self-assigned IP address of Apalis board. If this does not work, connect a VGA display to X24 and USB keyboard/mouse to run Easy Installer.
ip addr show eth0
net 192.168.2.222
  1. Connect a USB Ethernet adapter to your host PC with manually assigned IP, for example 192.168.2.33, and connect an Ethernet cable between host and Apalis
  2. Run VNC at 192.168.2.222
  3. From EZ Installer running in VNC, select your image
  4. Press Install button

About 66% way through installer, I am getting an error

Error
Can’t open hddme-image-apalis-imx6-hddme1.dataimg.tar.xz

image

  1. Converted hddme-image-apalis-imx6-hddme1.dataimg.tar.gz to hddme-image-apalis-imx6-hddme1.dataimg.tar.xz and install completed

Installed image is still not booting.

I may try use Easy Installer to erase memory and reinstall again.

edward3@ubuntu:~/hddme_image/releases/usb$ tree -L 2
.
β”œβ”€β”€ Apalis-iMX6_ToradexEasyInstaller_1.8-20181019
β”‚   β”œβ”€β”€ boot.scr
β”‚   β”œβ”€β”€ boot-sdp.scr
β”‚   β”œβ”€β”€ image.json
β”‚   β”œβ”€β”€ recovery
β”‚   β”œβ”€β”€ recovery-linux.sh
β”‚   β”œβ”€β”€ recovery-windows.bat
β”‚   β”œβ”€β”€ SPL
β”‚   β”œβ”€β”€ tezi.itb
β”‚   β”œβ”€β”€ tezi.png
β”‚   β”œβ”€β”€ u-boot.img
β”‚   └── wrapup.sh
β”œβ”€β”€ boot.scr
β”œβ”€β”€ boot-sdp.scr
β”œβ”€β”€ hddme-image-apalis-imx6-hddme1-20221103202356-Tezi_3.0.4
β”‚   β”œβ”€β”€ hddme-image-apalis-imx6-hddme1.bootfs.tar.xz
β”‚   β”œβ”€β”€ hddme-image-apalis-imx6-hddme1.dataimg.tar.gz
β”‚   β”œβ”€β”€ hddme-image-apalis-imx6-hddme1.tar.xz
β”‚   β”œβ”€β”€ hddme.png
β”‚   β”œβ”€β”€ image.json
β”‚   β”œβ”€β”€ marketing.tar
β”‚   β”œβ”€β”€ prepare.sh
β”‚   β”œβ”€β”€ SPL
β”‚   β”œβ”€β”€ TEZI_SUBSITE_EULA.TXT
β”‚   β”œβ”€β”€ u-boot.img
β”‚   β”œβ”€β”€ uEnv.txt
β”‚   └── wrapup.sh
β”œβ”€β”€ image.json
β”œβ”€β”€ recovery
β”‚   β”œβ”€β”€ imx_usb
β”‚   β”œβ”€β”€ imx_usb.conf
β”‚   β”œβ”€β”€ imx_usb.exe
β”‚   β”œβ”€β”€ mx6ull_usb_rom.conf
β”‚   β”œβ”€β”€ mx6ull_usb_sdp_uboot.conf
β”‚   β”œβ”€β”€ mx6_usb_rom.conf
β”‚   β”œβ”€β”€ mx6_usb_sdp_spl.conf
β”‚   β”œβ”€β”€ mx6_usb_sdp_uboot.conf
β”‚   β”œβ”€β”€ mx7_usb_rom.conf
β”‚   β”œβ”€β”€ mx7_usb_sdp_uboot.conf
β”‚   └── README
β”œβ”€β”€ recovery-linux.sh
β”œβ”€β”€ recovery-windows.bat
β”œβ”€β”€ SPL
β”œβ”€β”€ tezi.itb
β”œβ”€β”€ tezi.png
β”œβ”€β”€ u-boot.img
└── wrapup.sh

-Ed

After using EZ Serial to erase emcc, I no longer get any u-boot data from X29 serial debug.

Are there any methods to recover a Apalis iMX6 eval board in this state?

No uboot, nothing on VGA, nothing on serial debug.

Is my last resort to short these two pads? Do I need to short only on power-up, or I do I need to maintain the short?

Thank you,

-Ed

Hi @embeddEd,

To recover your module, please check the steps below:

  1. Download our latest Easy Installer for Apalis iMX6 here: https://artifacts.toradex.com/artifactory/tezi-oe-prod-frankfurt/dunfell-5.x.y/release/13/apalis-imx6/tezi/tezi-run/oedeploy/Apalis-iMX6_ToradexEasyInstaller_5.7.1+build.13.zip
  2. Connect the USB cable to your Host computer using the X49 or X50 port in your carrier board.
  3. Short the pins that you mentioned in the above image and then, with the pins shorted, boot up your module. Wait a few seconds and remove the short. Your module should be in recovery mode now.
  4. Run the script to load Toradex Easy Installer.
  5. Now you can connect to your Toradex Easy Installer using VNC.

I think you got everything right. The problem is the image you’re trying to install. The file is in the format name.tar.xz, but it should be a name.tar file. Only tar is accepted by Toradex Easy Installer. You can decompress the file to make it .tar only and try if it will work.

Can you please tell me where you downloaded this image?

Best Regards,
Hiago.

1 Like

@Hiago thank for your reply

I do not see any USB serial ports appear on my host, when I connect to either X50 ( USB01_CL ) or X49 ( USB01 (SS) ) on the Apalis carrier board? A green LED lights up on carrier when a USB cable is connected to either, but my host does not display any new USB serial ports?

The serial debug port X29 appears as a USB serial device. Before I erased emmc, X29 displayed u-boot prompt. Now X29 displays nothing.

I built image using the yocto build we use for production of this product. I expect the main developer is mainly using mender and may not ever use the /releases/usb/hddme-image-apalis-imx6-hddme1-20221103202356-Tezi_3.0.4 folder containing the tar files. However, when I tried recompress the gz as xz and the installer seemed to be happy and stopped complaining. But now I am stuck with no activity on the USB serial ports.

Thank you,

-Ed

The X50 (and X49 as well since they are connected in parallel) is a USB OTG port so you shouldn’t see any USB serial port when you connect it to your host computer. The USB to serial converter is routed to X29 connector.
IF you erase eMMC it will delete U_Boot and you will not see any output on X29. In this situation you should use HW mechanism to enter into a recovery mode as it described above by embeddEd

1 Like

@alex.tx thank your for details explaining.

Running recovery-windows.bat without shorting SOM pads launches uboot, and loaded tezi.itb. I do not understand how recovery-windows.bat automatically loaded uboot over the OTG port. Magic.

On debug serial terminal, the boot is stuck in a loop β€œA start job is running for /dev/mmcblk1p1”, and β€œA start job is running for /dev/mmcblk1p2”. This was after I reinstalled my yocto built image using TEZI from USB stick.

Start job boot loop:

Industrial temperature grade DDR3 timings.
Trying to boot from MMC1

U-Boot 2019.07-0+git.b90d461f8277 (Nov 03 2022 - 15:11:47 +0000)

CPU:   Freescale i.MX6D rev1.5 at 792MHz
CPU:   Industrial temperature grade (-40C to 105C) at 38C
Reset cause: POR
DRAM:  1 GiB
PMIC:  device id: 0x10, revision id: 0x21, programmed
MMC:   FSL_SDHC: 1, FSL_SDHC: 2, FSL_SDHC: 0
Loading Environment from MMC... *** Warning - bad CRC, using default environment

Display: wvga-lvds (800x480)
In:    serial
Out:   serial
Err:   serial
Model: Toradex Apalis iMX6 Dual 1GB IT V1.1B, Serial# 05212386
Net:   using PHY at 7
FEC [PRIME]
Hit any key to stop autoboot:  0 
MMC: no card present
Card did not respond to voltage select!
switch to partitions #0, OK
mmc0(part 0) is current device
Scanning mmc 0:1...
Found U-Boot script /boot.scr
1836 bytes read in 23 ms (77.1 KiB/s)
## Executing script at 17000000
Setting bus to 0
Error writing the chip: -121
Setting bus to 0
Valid chip addresses:
81335 bytes read in 21 ms (3.7 MiB/s)
14 bytes read in 11 ms (1000 Bytes/s)
5403248 bytes read in 206 ms (25 MiB/s)
## Flattened Device Tree blob at 12100000
   Booting using the fdt blob at 0x12100000
   Using Device Tree in place at 12100000, end 12136fff

Starting kernel ...

[    0.099752] pca953x 1-0070: failed reading register
[    0.324849] fxl6408 1-0044: FXL6408 probe returned DID: 0xfa
[    0.525253] fxos8700 3-001f: read chip ID 0x1 is not equal to 0xc7 or 0xc4
[    0.612831] sbs-battery 1-000b: sbs_probe: Failed to get device status
[    0.814750] leds_pwm pwmleds: unable to request PWM for blue:led1: -22
[    1.003394] fsl-hdmi-dai soc:hdmi_audio@00120000: failed to probe. Load HDMI-video first.
[    1.026491] imx-audio-hdmi sound-hdmi: initialize HDMI-audio failed. load HDMI-video first!
[    1.948721] BT: Loading driver
[    2.083744] BT Request firmware: nxp/emmy-w1-sdio/sd8887_uapsta_a2.bin
[    3.244235] BT: FW download over, size 632896 bytes
[    3.949889] BT FW is active(3)
[    4.079152] BT: Driver loaded successfully
[    4.121371] BT: Loading driver
[    4.164648] BT: Cannot create proc interface
[    4.193998] kobject_add_internal failed for bt_fm_nfc with -EEXIST, don't try to register things with the same name in the same directory.
[    4.206537] Unable to allocate class
[    4.210610] BT: Driver loading failed
[    4.371766] wlan: Loading MWLAN driver
[    4.456373] vendor=0x02DF device=0x9135 class=0 function=1
[    4.483454] SDIO: max_segs=128 max_seg_size=65535
[    4.488176] rx_work=1 cpu_num=2
[    4.583192] Request firmware: nxp/emmy-w1-sdio/sd8887_uapsta_a2.bin
[    4.614538] WLAN FW is active
[    4.639830] Trying download country_power_tble: nxp/emmy-w1-sdio/rgpower_00.bin
[    4.718807] wlan: version = SD8887-15.68.19.p47-C4X15C680-GPL-(FP68) 
[    4.739823] wlan: Driver loaded successfully
[.[0m.[0;31m*     .[0m] (1 of 2) A start job is running for /dev/mmcblk1p2 (8s / 1min 30s)
.M
.[K[.[0;1;31m*.[0m.[0;31m*    .[0m] (1 of 2) A start job is running for /dev/mmcblk1p2 (9s / 1min 30s)
.M
.[K[.[0;31m*.[0;1;31m*.[0m.[0;31m*   .[0m] (1 of 2) A start job is running for /dev/mmcblk1p2 (10s / 1min 30s)
.M
.[K[ .[0;31m*.[0;1;31m*.[0m.[0;31m*  .[0m] (2 of 2) A start job is running for /dev/mmcblk1p1 (10s / 1min 30s)
.M
.[K[  .[0;31m*.[0;1;31m*.[0m.[0;31m* .[0m] (2 of 2) A start job is running for /dev/mmcblk1p1 (11s / 1min 30s)
.M
.[K[   .[0;31m*.[0;1;31m*.[0m.[0;31m*.[0m] (2 of 2) A start

@hfranco.tx said only tar files are accepted by Toradex Easy Installer

I should convert all of these *.tar.xz and *tar.gz files in my releases/usb folder into raw uncompressed *.tar format in order for Easy Installer to work properly?

β”œβ”€β”€ hddme-image-apalis-imx6-hddme1-20221103202356-Tezi_3.0.4
β”‚   β”œβ”€β”€ hddme-image-apalis-imx6-hddme1.bootfs.tar.xz
β”‚   β”œβ”€β”€ hddme-image-apalis-imx6-hddme1.dataimg.tar.gz
β”‚   β”œβ”€β”€ hddme-image-apalis-imx6-hddme1.tar.xz

And then modify the image.json *.tar.xz to *.tar ?

~/hddme_image/releases/usb/hddme-image-apalis-imx6-hddme1-20221103202356-Tezi_3.0.4/image.json

{
    "config_format": 2,
    "autoinstall": false,
    "name": "HDDME Image",
    "description": "HDDME Image.",
    "version": "Qt 5.15.6",
    "release_date": "2022-11-03",
    "u_boot_env": "uEnv.txt",
    "prepare_script": "prepare.sh",
    "wrapup_script": "wrapup.sh",
    "marketing": "marketing.tar",
    "license_title": "END USER LICENSE AGREEMENT",
    "license": "TEZI_EULA.TXT",
    "icon": "hddme.png",
    "supported_product_ids": [
        "0027",
        "0028",
        "0029",
        "0035"
    ],
    "blockdevs": [
        {
            "name": "mmcblk0",
            "partitions": [
                {
                    "partition_size_nominal": 24,
                    "want_maximised": false,
                    "content": {
                        "label": "BOOT",
                        "filesystem_type": "FAT",
                        "mkfs_options": "",
                        "filename": "hddme-image-apalis-imx6-hddme1.bootfs.tar.xz",
                        "uncompressed_size": 5.8515625
                    }
                },
                {
                    "partition_size_nominal": 512,
                    "want_maximised": true,
                    "content": {
                        "label": "RFSA",
                        "filesystem_type": "ext4",
                        "mkfs_options": "-E nodiscard",
                        "filename": "hddme-image-apalis-imx6-hddme1.tar.xz",
                        "uncompressed_size": 1277.6328125
                    }
                },
                {
                    "partition_size_nominal": 512,
                    "want_maximised": true,
                    "content": {
                        "label": "RFSB",
                        "filesystem_type": "ext4",
                        "mkfs_options": "-E nodiscard",
                        "filename": "hddme-image-apalis-imx6-hddme1.tar.xz",
                        "uncompressed_size": 1277.6328125
                    }
                },
                {
                    "partition_size_nominal": "128",
                    "want_maximised": false,
                    "content": {
                        "label": "DATA",
                        "filesystem_type": "ext4",
                        "mkfs_options": "-E nodiscard",
                        "filename": "hddme-image-apalis-imx6-hddme1.dataimg.tar.xz",
                        "uncompressed_size": 1277.6328125
                    }
                }
            ]
        },
        {
            "name": "mmcblk0boot0",
            "erase": true,
            "content": {
                "filesystem_type": "raw",
                "rawfiles": [
                    {
                        "filename": "SPL",
                        "dd_options": "seek=2"
                    },
                    {
                        "filename": "u-boot.img",
                        "dd_options": "seek=138"
                    }
                ]
            }
        }
    ]
}

Thank you,

-Ed

Hi @embeddEd,

I apologize for the long delay.

Your Yocto builds, following our layers and guides, will automatically produce a Tezi image for you. After Yocto finishes, you should see your image under oe-core/build/deploy/images/apalis-imx6. For example (for Apalis iMX8):

$ find . -iname "*Tezi*"
./Apalis-iMX8_Reference-Minimal-Image-Tezi_5.7.1-devel-20221017184759+build.0.tar

If you copy this tar file to your USB stick and flash it using Toradex Easy Installer, everything is expected to work. You don’t need to convert files from tar.xz or tar.gz to .tar.

Can you please explain how you are building your Yocto image and which files are you trying to flash?

Best Regards.
Hiago