Hello,
I am very very new to using the IMX8 and I know only few stuffs in Linux. But I am super excited to use learn. From here I want to request you to please bare with my minimal questions and also I request you to please answer me in a way I could easily understand. Thanks in Advance.
I am currently using the IMX8 and connected a LVDS display. The display works fine after I edited the device tree overlay. To begin to develop a python based GUI, I connected to Toradex carrier board to using the visual studio code and created a new python application, with the Qt for python using QML template selected. So I got the basic example and exicuted the main.py. As a result I got the hello world GUI with a button , displayed on my LVDS screen.
I exicuted the same main.py again but unfortunatelly, I could not see the GUI on the display but the program is exicuted. I get the error in the terminal as follows.
“” libEGL warning: DRI2: failed to create dri screen “”.
I am surly not aware why this is happening. I would appriciate your helpful response, Please.
Hi @sivagganesan ,
Welcome to our Community! Please feel free to explore other topics you might find interesting.
Just confirm me the following:
- You’re using an Apalis iMX8, is this correct?
- What carrier board are you using?
- What TorizonCore version are you using? Check it by running
cat /etc/os-releaseon the module. - When the GUI doesn’t appear, is the program running or does it stop?
- How are you executing your project? By pressing F5 in VSCode?
If I remember correctly the libEGL warning message you got also happens when the Hello World GUI example works, so I don’t think it’s related to your issue.
You can try doing another test Python QML project, debug it two times and see if this behavior happens consistently.
Best regards,
Lucas Akira
Thank so much @lucas_a.tx
Yes, I am using IMX8 on the Ixora V1.2A carrier board. The torizon core version that is being used is 5.6.0+build.13 (dunfell). No the program does not drop, it exicutes and I could see hello world on the output terminal. I tried exicuting in two way, first by pressing F5 and other way by built, deploy, and run container.
Also I need to to tell you that, I try to close manually the torizon_portainer container so to have only torizon_weston_1 and my example code container running. when I do this, I could see the display freezes, even I close the container the torizon page on my display does not get closed and I could not move the mouse curser too.
Is there a way, to close other containers before execution?
I tried another test Python QML project, debuging it two times and I see the same frozen screen.
Thank you so so much in advance for help, to make me understand this issue.
I was able to reproduce the screen freezing while trying to deploy the Python QML sample project.
A possible cause for it could be related to this: When you run the Python GUI QML example the IDE Extension deploys two containers into the module: One with your Python app, and another with Weston, the graphical interface that takes care of displaying everything on screen.
In the evaluation containers that come with TorizonCore you have one running Portainer, and another running Weston as well.
So the screen freezing could be due to conflicts between the two Weston containers trying to control the display at the same time.
To avoid this you can stop all running containers in the module by running docker stop $(docker ps -a -q).
You can also create a script that does this every time you deploy the QML containers. To do this:
- Create a text file with the following content:
#!/bin/sh
echo "Killing docker processes"
docker stop $(docker ps -a -q)
echo "Killed"
This is the script itself.
-
Name it like for example
stop_containers.shand save it in<path-to-your-vscode-project>/appconfig-0/; -
In our extension configurations edit the
startupscriptfield and put the name of your script as value e.g.stop_containers.sh; -
Now every time you press F5 VSCode will run the script, stopping any running containers in the device before deploying.
Try doing the above suggestions and see it helps you.
Best regards,
Lucas Akira
Hello @lucas_a.tx , thank you so much, yes, it works. Thank you so much for that, I could progress on my work now.
I would also take this opportunity to ask you the simple as well easy to do method to rotate the content shown on the screen to 90deg, Please. I tried to web surf on this problem but could not come up with a basic method. I would be very happy if you could help me on this, Please.
Thank you in advance.
Hi @sivagganesan ,
No problem, I’m glad to help!
The screen can be rotated in Weston by changing the config file weston.ini inside its respective container.
To do this using the IDE extension:
- You need to bind mount a directory which has the updated
weston.ini, replacing the older one:- Following this section in our developer page, make a copy of
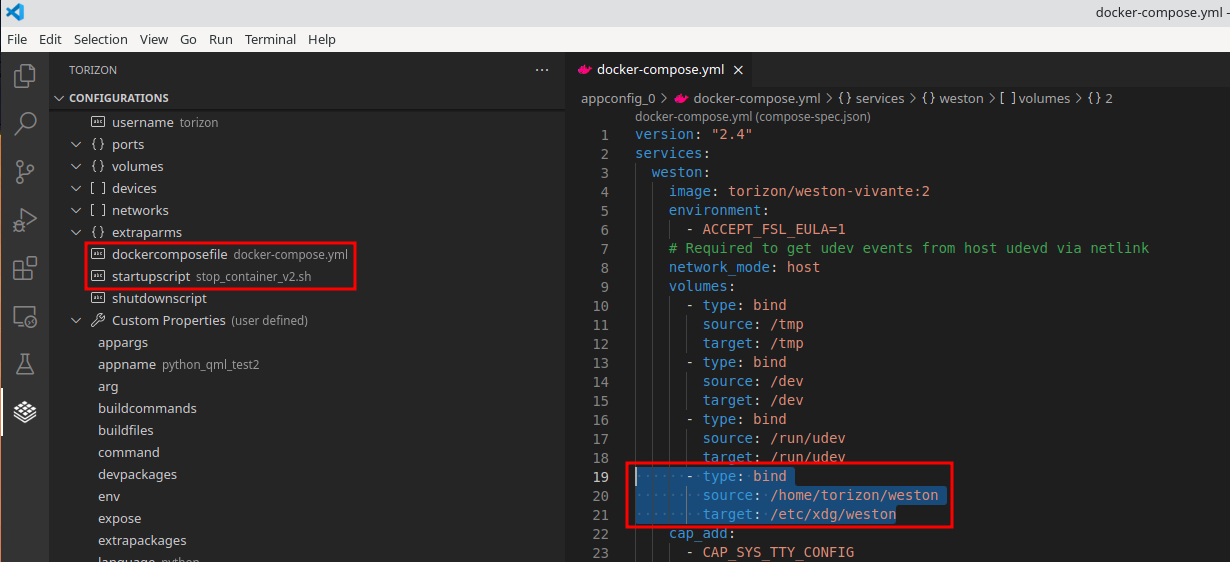
appconfig_0/work/docker-compose.yml.debugtoappconfig_0/docker-compose.yml; - Go to the extension configurations, write
docker-compose.ymlin thedockercomposefilefield. - In
docker-compose.ymlyou’ll see something similar to this:
- Following this section in our developer page, make a copy of
version: "2.4"
services:
  weston:
    image: torizon/weston-vivante:2
    environment:
      - ACCEPT_FSL_EULA=1
    # Required to get udev events from host udevd via netlink
    network_mode: host
    volumes:
      - type: bind
        source: /tmp
        target: /tmp
      - type: bind
        source: /dev
        target: /dev
      - type: bind
        source: /run/udev
        target: /run/udev
[...]
After target: /run/udev add these three lines:
      - type: bind
        source: /home/torizon/weston
        target: /etc/xdg/weston
-
Update your startup script to include the new
weston.ini, like this one:
stop_container_v2.sh (1.4 KB) -
Check if the
startupscriptfield still has the correct name of the script and correct it if it doesn’t.
The extension configs at the end should be similar to this:
Try running the Python project and the screen should be rotated by 90 degrees. You can change the angle by altering the last line in the attached file above e.g. transform=rotate-270, see this page for more details: weston.ini(5) — weston — Debian unstable — Debian Manpages
Let me know if this works for you.
Best regards,
Lucas Akira
Hello @lucas_a.tx
Thank you so so much, that’s fantastic, everything works fine as expected, following your explanations on how to do. As a begineer, I am very happy and motivated to use toradex products in my future projects. A great thanks for the toradex community support.
Ofcourse, I am comming up again for your help on an other challenge!!..
I am planning to use a camera in my project, baught from IDS imaging service. I used a python pakage named " pyueye 4.96.952 " for acquiring frames from the IDS camera, in my python program. On my windows computer this program works well but now I want to connect this camera in one of the USB port of the toradex carrier board and acquire frames.
Here you could find the software suit for the camera to work on ARM " IDS Software Suite 4.96.1 for Linux ", but I would liek to know how those drivers can be insalled on the toradex system.
If you could help me on how to use third party camera drivers on toradex? what could be the ways to establish this? I would be very happy if you could help me on this, Please.
Thank you in advance.
Hello @lucas_a.tx , I tried few steps to see if I could progress on this, but unfortunately I did not.
I tried to add the camera drivers " .deb files" in the buildfiles field, for example one of the deb.file that was added is (started with " COPY ueye_4.96.1.2054_arm64.deb "). Like wise all the provided deb files were added to the field and ended with /home/torizon/ . (all the deb files give by the camera provider were added in the project/appconfig_0). as a final step in the field buildcommands: RUN dpkg -I *.deb && pip install pyueye were added. As well included the extra pakages as follows
python3-minimal python3-pip python3-setuptools.
When I built with this config, I have an error stating that the .deb file contains no control component.
I would be happy to know if you could suggest me a simpler way and more understandable, Please.
Thank you in advance.
Hi @sivagganesan ,
I can give you some suggestions:
-
Copying the .deb files to the container using
buildfileslike you did should work; -
You can install
pyueyeby writing it inrequirements.txt, as said here: Python Development and Debugging on TorizonCore Using Visual Studio Code | Toradex Developer Center ; no need to usebuildcommandsto do this. -
You probably don’t need to include the Python 3 packages in extra packages, as your project template already installs Python in the container;
-
In
buildcommandsyou useddpkg -I, which shows the package info for a specific .deb file (this probably explains the error message you’re getting). To install it usedpkg -i <.deb file>. -
Keep in mind that using
dpkg -i *.debwould install all deb files without necessarily respecting dependency order. The link you’ve referenced states that two specific packages should be installed first, so do it like this:
RUN dpkg -i <pkg1.deb> && dpkg -i <pkg2.deb> && ...
Hope this helps you.
Best regards,
Lucas Akira
hello @lucas_a.tx
Thanks for your suggestions, I tried to install the deb packages separately, but unfortunately I could not install a package named <ueye-common_4.96.1.2054_arm64.deb> , this is the package that has to be installed before installing the main drivers for the camera.
The steps that I did:
First I
- copied all the necessary deb files to the appconfig_0 folder
- in the buildfiles field I did COPY all the pakages to the /home/torizon
- I tried to install all the deb files by using RUN dpkg -i /home/torizon/<pakage 1> && dpkg -i /home/torizon/ <pakage 2> , but this gave error but could not understand why and from which deb file it throws up error. So I decided to install each and every deb file manually so I could understand where the problem is. For this purpose I did the following
- entered into the docker where the deb files are using the command <docker exec -it -u 0 --priviliged /bin/bash>
- and used the <sudo dpkg -i >, during this when I installed the “ueye-common_4.96.1.2054_arm64.deb” package, I got the error …
[ Failed to connect to bus: No data available
dpkg: error processing package ueye-common (–install):
installed ueye-common package post-installation script subprocess returned error exit status 1
Errors were encountered while processing:
ueye-common ].
I do not know what it means " Failed to connect to bus: ". I would be very very happy if you could help me out here, Please.
Also , the first preference for me would be to install all the camera drivers directly to the target machine instead on the container. But I did not find a way to extract the deb files on the target machine. or May be I do not know the way to do. Is it possible to do that?
Thank you so so much for your extended support on this, Please.
Have a great day,
Failed to connect to bus: No data available
Not exactly sure what it means, but probably the package is trying to access the camera and is not able to.
By default a container doesn’t have permission to access devices, so you could try mounting the device via --device if you know the path e.g. /dev/<device> or /dev. You can also try running the container with parameter --privileged, although security-wise it’s not very recommended as it gives the container a lot of control over the system. Use it at your own risk.
Also , the first preference for me would be to install all the camera drivers directly to the target machine instead on the container.
If using a container doesn’t work you would have to rebuild TorizonCore using Yocto and install your deb files in it.
Keep in mind that using Yocto usually takes some time to learn the basics and it can get complex, specially if errors occur during a build.
Here are some useful links about Yocto:
- Yocto Project | Toradex Developer Center
- Custom meta layers, recipes and images in Yocto Project (hello-world examples) | Toradex Developer Center
- Build Torizon OS from Source With Yocto Project/OpenEmbedded | Toradex Developer Center
But I did not find a way to extract the deb files on the target machine. or May be I do not know the way to do. Is it possible to do that?
Technically it is possible to do that by manually extracting the contents of the deb files on your host PC and then copy their contents to the module using scp for instance. However in TorizonCore some system directories like /usr are read-only, so this method will not always work.
Best regards,
Lucas Akira