Colibri iMX6ULL: Torizon with containers not coming up

Hello everyone, new Toradex user here

I got an iMX6ULL Colibri (v1.1) with Aster and resistive 7" LCD.
First I’m connecting the VGA to a monitor, tried the LCD but doesn’t boot with that on.
Easy installer works, so I first tried a minimal Linux and it went fine.

Then I want to install Torizon with example containers, so I reset the board, load easy installer again, enable the additional sources and install the latest (5.0.0 if I remember correctly).

I tried this twice, and both times after downloading everything the screen goes grey and stays there.
I left it like this for 30m hoping it would recover but doesn’t seem it happens.
When I reset the board, Torizon comes up in command line, no portainer and no apps.

What can I try?

Hi @erupter,

Welcome to the Toradex Community. Feel free to explore the platform and also give feedback on the dedicated spaces, so we can further improve the platform.

Could you please check again, which version of Torizon you installed?
The latest version you should see on Toradex Easy Installer is Torizon 5.4.

Could you be more specific about the display situation? So you said that the device is not booting with a VGA monitor attached? If you remove the monitor the device then boots, but shows a black screen. Did I get this right?

Best Regards
Kevin

Hi @kevin.tx

Thanks for your message.
In the meantime I discovered my module is not officially supported by Torizon.
I got the 256MB non-eMMC version of the Colibri iMX6ULL, and I read that Torizon is only supported on the 1GB version.
TorizonCore Technical Overview is the link to the Torizon documentation where it mentions the 1GB iMX6ULL version being the only supported one.

First I upgraded the Easy Installer to the latest version, then I installed TorizonCore with Evaluation Containers. For this variant nothing beyond 5.0.0 is shown on the list.
And that one does not complete the install process correctly, getting stuck on a grey screen. (with the VGA plugged in that is).
So I proceeded with Embedded Linux with Multimedia 5.4.0

As for the booting, it boots and works fine with the VGA port, I got a Dell FullHD on it and it works out of the box. Though the wayland settings send the image out of the screen.
But when I attach the Toradex 7" Parallel LCD to the flexcable connector, nothing appears in any case.
I read in Resistive Touch Screen (Linux) that device overlays are not supported on my colibri, and this LCD should be supported out of the box, and yet I can’t get anything displayed on it.
I tried with EasyInstall as well as Torizon, but neither works.

At this link here Display Output, Resolution and Timings (Linux) I read that I should be able to use setenv to set some parameters but this command does not exist on my system.

Moreover I expected to have multiple framebuffers, one for the VGA and one for the LCD but I only have one. How do I enable the LCD? As I mentioned above, it should be enabled by default but it doesn’t appear it is.

Overall so far it’s quite confusing: I was expecting a simple guide to follow to enable a Colibri with Parallel LCD, but I can’t seem to find it. On First Steps with Resistive Touch Display 7" Parallel I can read two possible options, and both don’t work: the module does not have overlays and setenv does not exist.

Hi @erupter ,

Yes correct. I overlooked it the first time round.

Currently the Colibri iMX6ULL is not supported by Torizon. This is due to the fact that the module is lacking RAM to launch the whole docker environment. As you correctly identified, the 1GB version will support it, but as you might have seen this product is still in development.

You are also correct about the overlays. When you say you tried with the Easy Installer, does this mean that the Easy Installer was also not displaying anything on the Parallel LCD?

The command you tried to use “setenv” is used in U-boot. So to use it you have to press a key while the module is booting. Then you can access u-boot and there you should be able to enter the “setenv” command.

Try to apply the setting in u-boot and let me know if you have an image on your display now.

Best Regards
Kevin

Hi @kevin.tx

Thank you for the clarification. I can’t seem to be able to either see or interrupt uboot via the usb keyboard. Do I need to connect to a hardware serial port to do it?

Hi @erupter ,

Yes indeed. You need to be connected via a serial console to do that.

Best Regards
Kevin

Hi @kevin.tx

Yeah thought so.
I’m looking through the Aster datasheet, I tried connecting on the UART_B available on X20 as well as on UART_C available on X17. Both don’t show any traffic during boot.
UART_A is wired straight up to an FTDI chip that goes then to usb, I suspect that’s the OTG one?

So then which one is the one used during boot and how to I connect to it?

Hi @erupter ,

I recommend you have a look at this guide below:

There you should see all the necessary information.

I hope this helps

Best Regards
Kevin

Hi @kevin.tx

That’s the guide I used since the beginning, unfortunately it has no mentions of either the serial terminal or the LCD.

Also this guide on serial ports doesn’t mention the one that’s active during boot.

Hi @erupter

it is maybe not easy to recognize. But in Step2 of the link, you provided you can see the “Serial-to-USB converter” on X4.

So what you need to do is to plug in a Micro-USB Cable in X4 as shown in the Quick-Setup guide. With this cable, you can power the board as well as open a serial connection.

Let me know if it worked.

Best Regards
Kevin

Thank you @kevin.tx

I thought it required too much power, so I used that usb port with a power supply. Now I plugged it into my laptop and I’m able to access uboot.

So I used the following commands

setenv vidargs 'video=mxcfb0:dev=vdac,1920x1080M@60,if=RGB565 video=mxcfb1:dev=lcd,EDT-WVGA,if=RGB666 video=mxcfb2:off video=mxcfb3:off fbmem=32M'
saveenv

And the result is no change: LCD output is still off, and the VGA output is not FullHD.

Here is what printenv in uboot shows

vidargs=video=mxcfb0:dev=vdac,1920x1080M@60,if=RGB565 video=mxcfb1:dev=lcd,EDT-WVGA,if=RGB666 video=mxcfb2:off video=mxcfb3:off fbmem=32M
videomode=video=ctfb:x:640,y:480,depth:18,pclk:39722,le:48,ri:16,up:33,lo:10,hs:96,vs:2,sync:0,vmode:0

please notice that vidargs is what the tutorial says to set, but it did not exists before I put it there (checked with printenv) and that the video mode did not change

Then I did use the line specific to the iMX6ULL
setenv vidargs 'video=mxsfb:800x480M-16@60,pixclockpol=1'

The kernel reports the right command line

[ 0.000000] Kernel command line: user_debug=30 ubi.mtd=ubi root=ubi0:rootfs rw rootfstype=ubifs ubi.fm_autoconvert=1 console=tty1 console=ttymxc0,115200n8 consoleblank=0 video=mxsfb:800x480M-16@60,pixclockpol=1

but still nothing happens: the VGA is still the same (640x480), and the LCD is dark

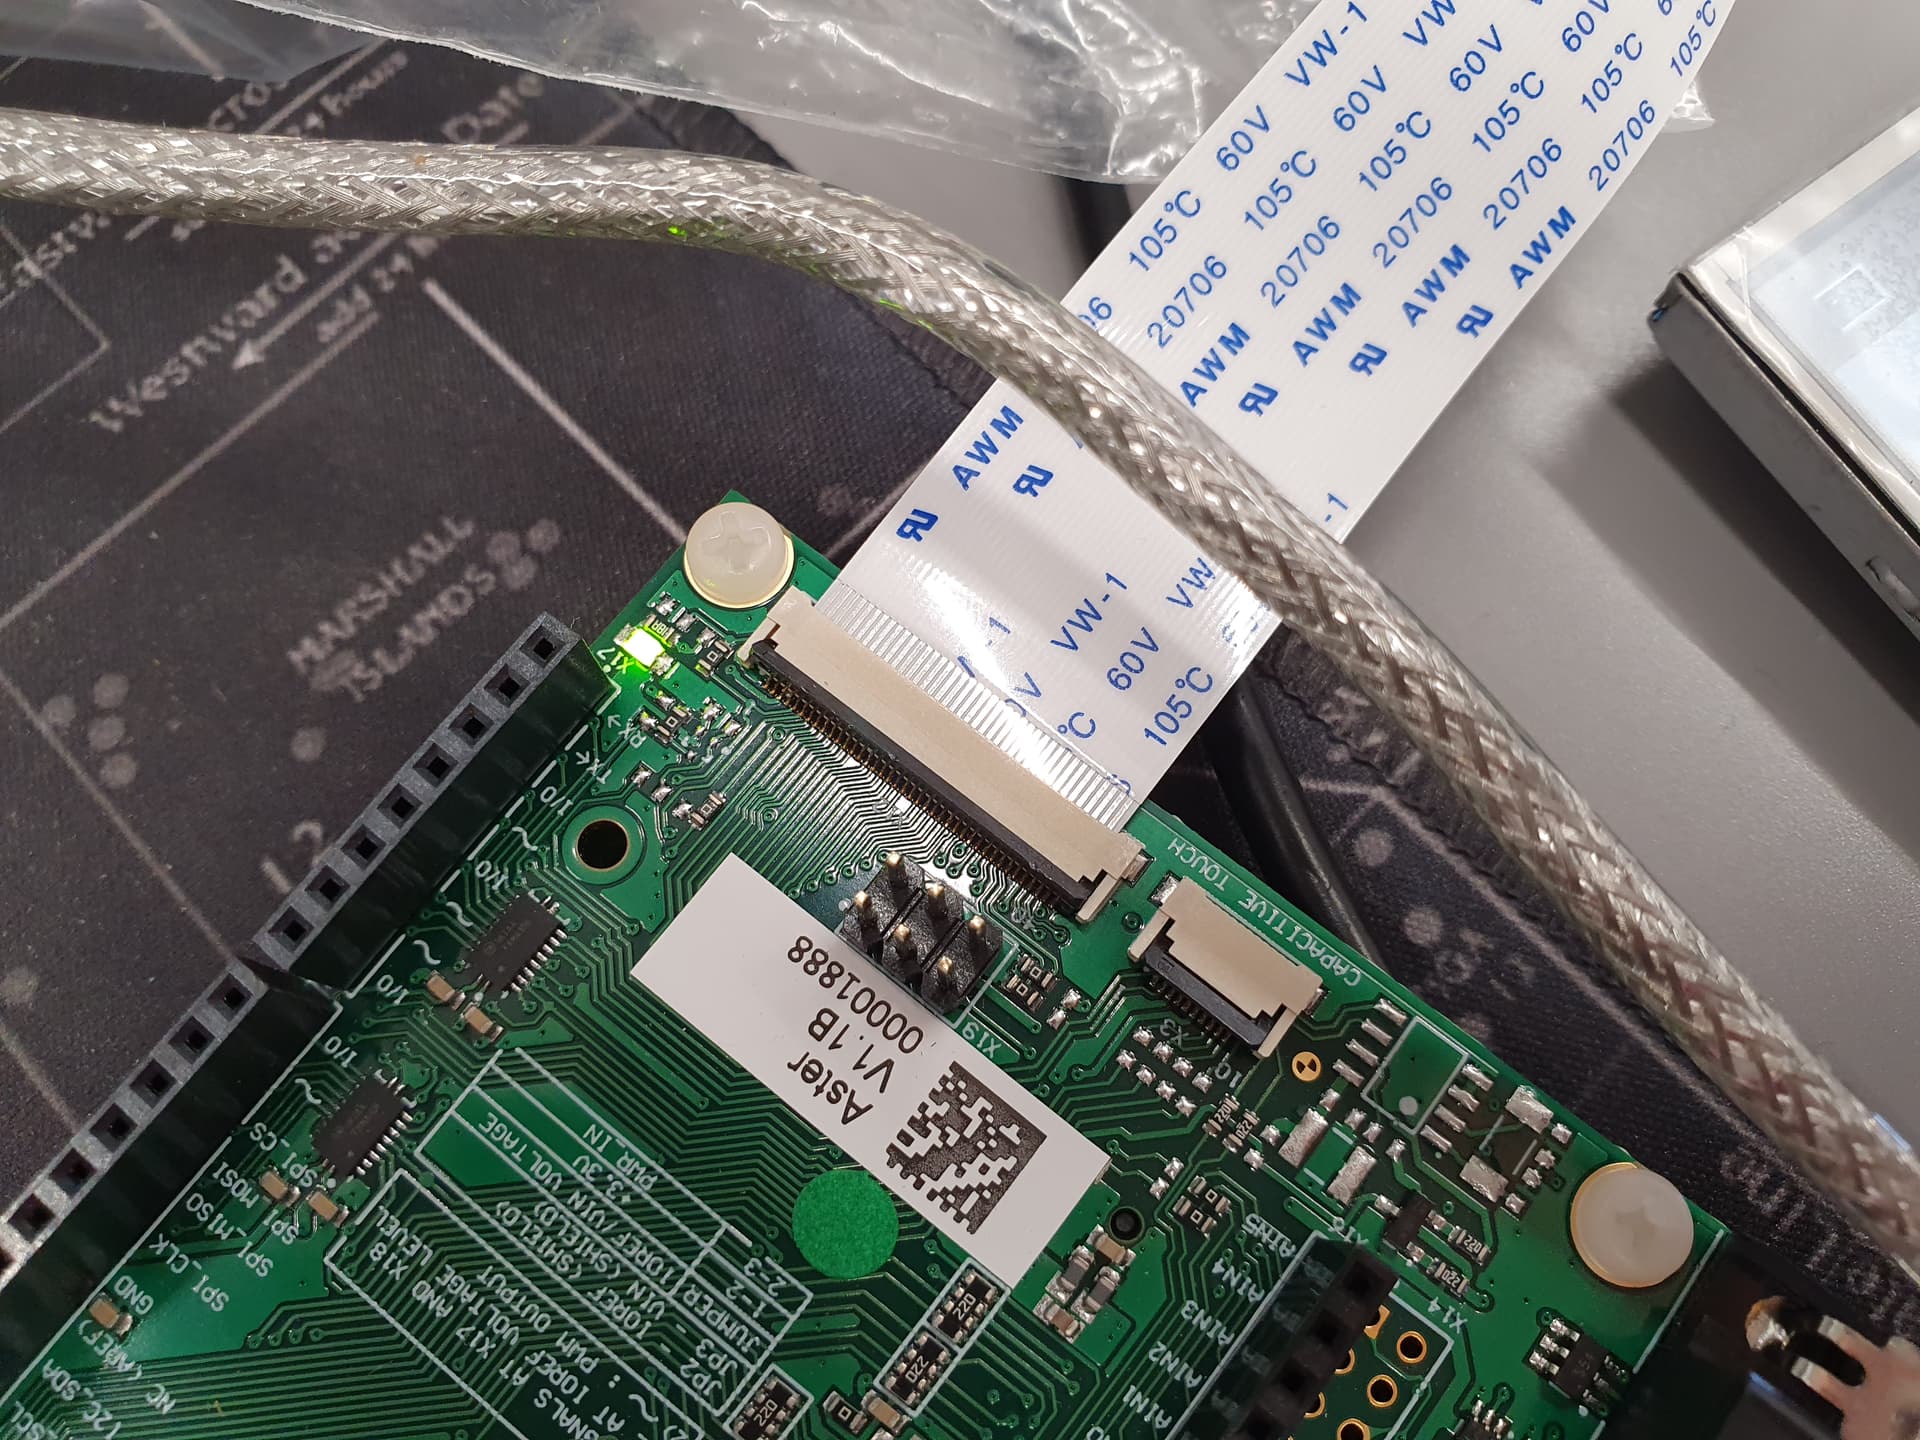
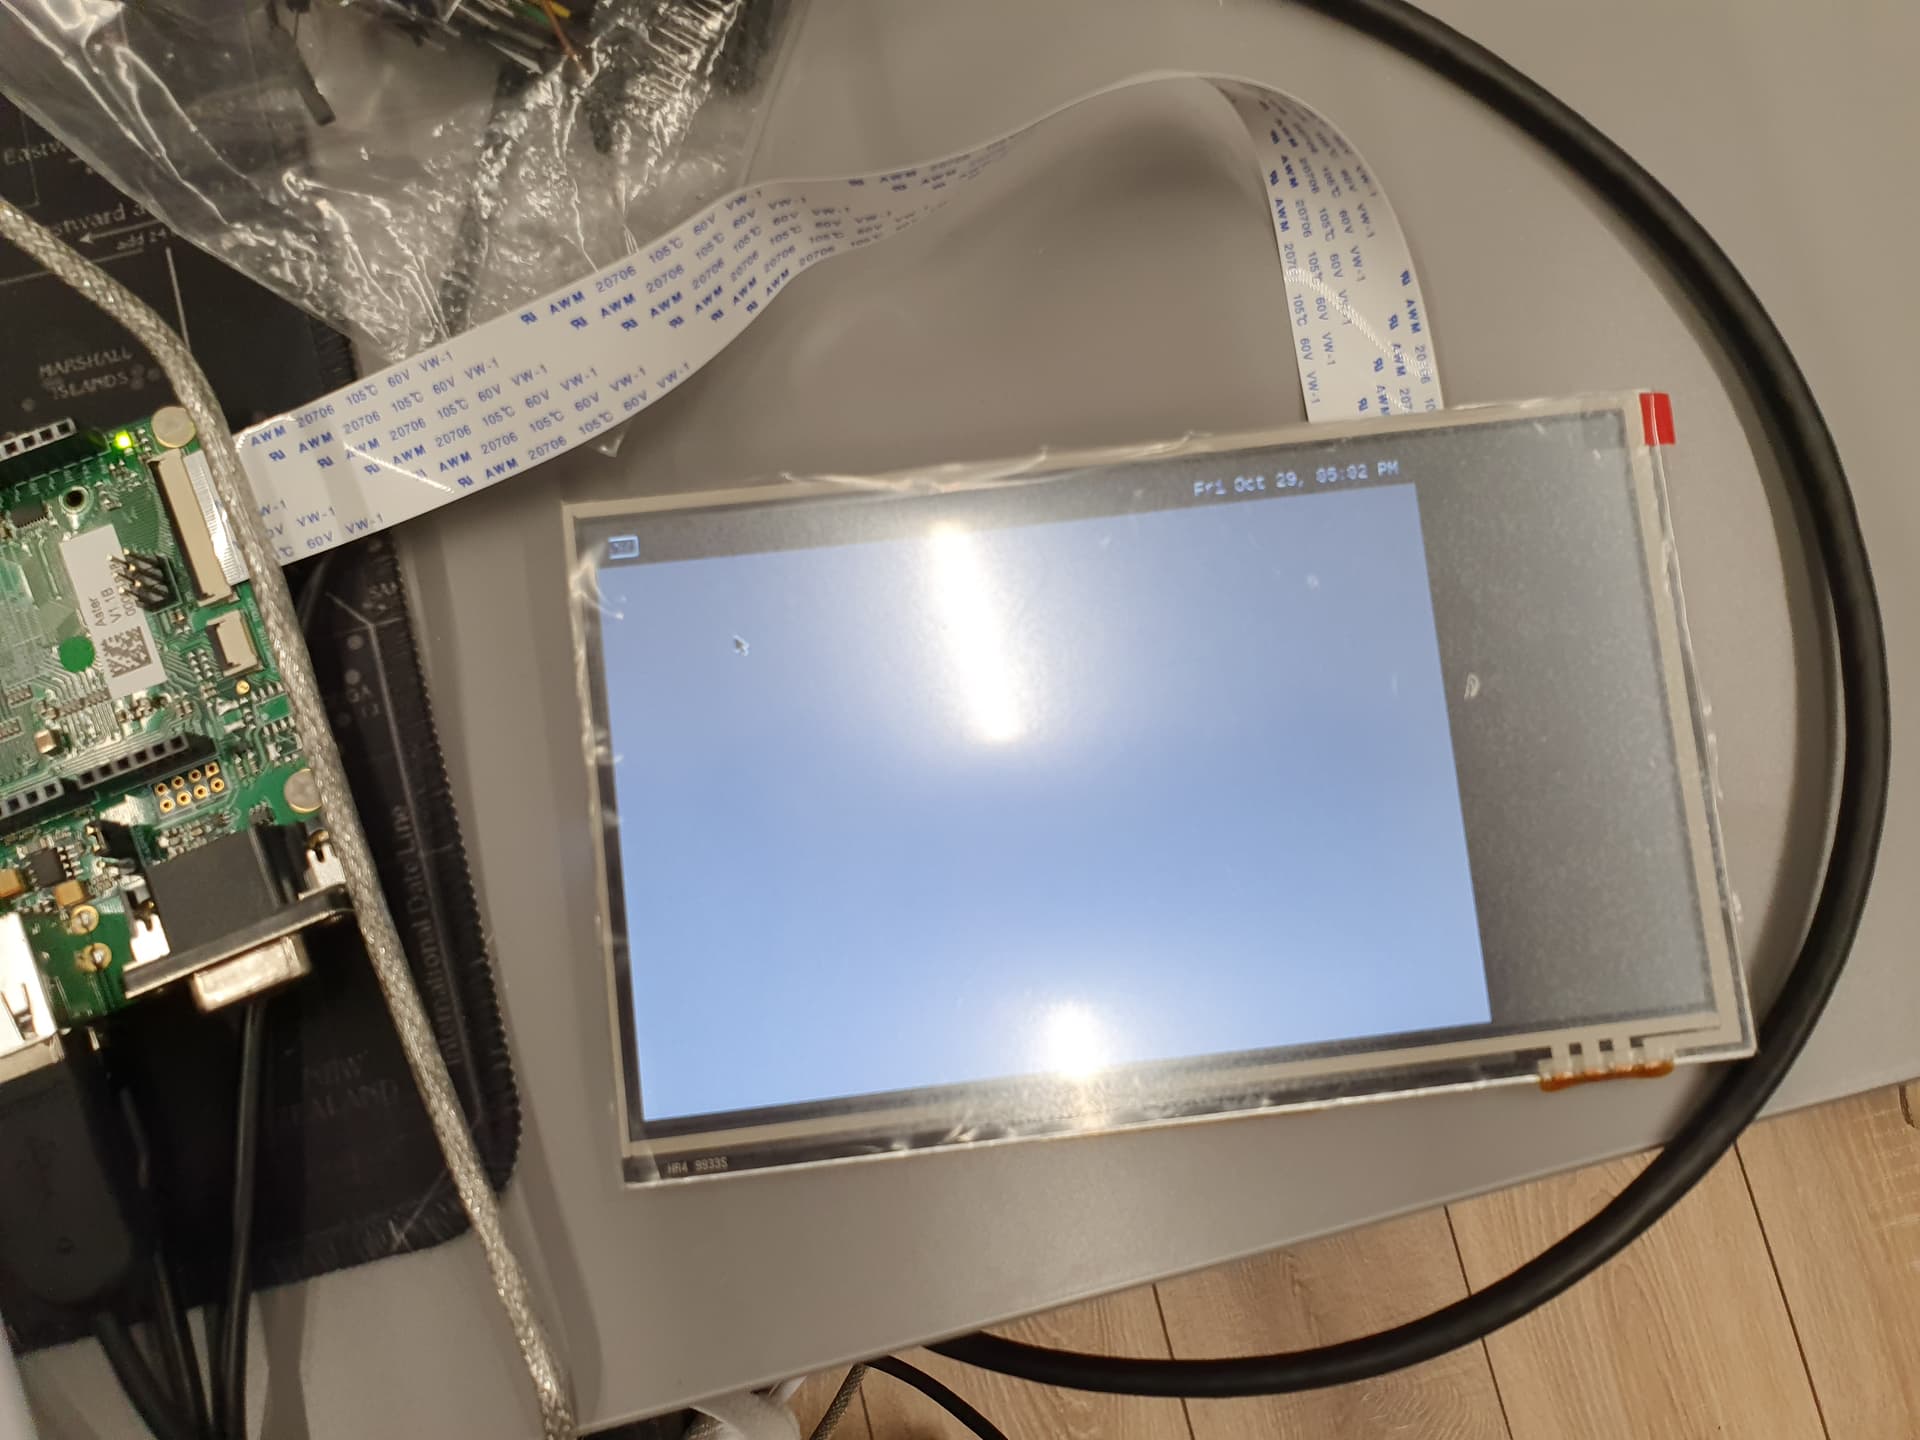
Ok I solved the LCD in a way I don’t understand: I had to flip the flex cable in the aster connector.
In the picture you can see the flexcable issue and the fact the frame buffer doesn’t get past 640x480 no matter what I do


Hi @erupter ,

I see that you made some progress in the meantime.

So, it is possible that this is an artifact of the fact that the module is officially not supported by Torizon.

Did you try some other image, like the Toradex Reference Image, and set the same configuration? Can you see the same behaviour there?

Best Regards
Kevin

Hi @kevin.tx

I went back and installed one of the images that is proposed without adding additional repositories, so I believe these are tested and guaranteed to work with this module.

I chose the LXDE one, and after disabling LXDE, changing the uboot configuration and running my application I can report that the framebuffer is finally doing what I tell it to do!

Thank you for your help!

Hi @erupter ,

glad that it worked out in the end.

Thanks for reporting that the issue is solved.

Have a nice weekend.

Best Regards
Kevin